
| [ Main index » Bicycle components tests » (Dynamo) bicycle lighting » Camera settings, camera height/position, lamp height, roads used, and markers for beamshots | ] |
Note: All settings of camera height and camera position as described on this page are subject to change as I'm still experimenting with what is best, i.e. what gives the best pictures so you can accurately judge how good a light beam of a given lamp is, and that it is close to what you see when you're sitting on a bike fitted with that lamp.
See for more on this the page Cameras and beamshots: Which roads to use, markers, how beamshots do not show what you see in reality.
I experimented with for example [ F3.5, ISO 80, 4s, White balance: 4600K ]. "White balance: Daylight" gives too yellow pictures. But I'm still experimenting with white balance. I will also make pictures with double exposure time to get a better image of the light beams of dynamo lamps, in particular the shape of the beam then becomes more clear.
I only have a limited selection of values F and shutter time to play with (at ISO 80) with the Samsung ST70 (in night scene mode), and I've chosen [ F3.5, ISO 80, 4s, White balance: Auto ] to be used as this is very close to the settings used on the forum of mtb-news.de ([ Blende: 4, ISO: 200, Zeit: 2s, Weißabgleich: Auto ] which gives a lot of material to compare with.
See http://www.mtb-news.de/forum/showpost.php?p=4144233&postcount=97 for the settings and explanation why, which seems pretty reasonable. Note further that as F is inversely proportional to the square root of the amount of light getting through (i.e. a measure of the inverse of the side of the square used to let light through), and ISO numbers are linear light sensitivity, it means [ F3.5, ISO 80, 4s ] is almost the same as [ F4, ISO 200, 2s ] because: 80 x 4 / (3.5 x 3.5) = 26.1, and 200 x 2 / (4 x 4) = 25.0, so they are about 4% too bright compared to the settings as used on mtb-news.de).
White-balance: There are sometimes colour differences of beamshots of the same lamp. This is caused, I think, by using auto white balance and surrounding light (some nights are a bit brighter, some even have a reddish sky and are not fully dark as you can see in the beamshot pictures) and also the width of the road, esp. for a gray road. For example, with a wide gray road there is very little colour so the camera may adjust the colour in a way that it shouldn't.
On mtb-news.de auto-white balance is used as 'the eye does a better job anyway', which is true, but I've come to the conclusion that another fixed setting is preferable, at least for making beamshots on asphalt roads. For dirt roads with lots of green this shouldn't be necessary, but I may as well use the fixed setting for all beamshots. I couldn't do that with the ST70, which only allows auto-WB with long exposure night-shots. I make will new beamshots and do various experiments with white balance from March May 2011. First experiments done in May, more in June 2011. Due to various circumstances, redoing beamshots of various headlamps will take a while though, probably until spring 2012. After various experiments I feel that not daylight, but WB=4600K is optimal. This was for example with the Philips LBL where WB=4600K gave pictures that most resemble what I see. However, I will do more tests in Sept/Oct 2011 with various LED colours and white balance settings and put the pictures on this page.
Temperature?: After glancing through the camera specs, it is specified for a temperature range of 0-40°C, hmm, it was freezing when I made the shots where I experienced larger deviations, could that influence the sensor?
2011-6-7 Zooming, field of view and human vision: I use magnification=1 (no zoom) so the standard field of view of a given camera (I could do that differently, some cameras have 24mm equiv. wide angle, others 28 mm etc.). Is that the most useful? Some people prefer shots from behind the lamp which shows the lamp itself and gives a better view of the whole situation. But a whole picture is never what you see on a bike anyway. When you look at the road, your focus (mental but also distance wise, which means the eyes at which your eyes focus) will go to a particular area, close or further away. This is also the problem of a complete-view beamshot and why it doesn't show what you experience unless you are aware of the problem and do a trick as I suggested on my page with the review of the E3-pro-StVZO. The beamshot pictures of E3-pro-StVZO clearly showed the problem of perspective over accentuation of the near field when comparing to beamshots of other headlamps. To counter that you can put a bit of paper on the bottom of beamshots, then slide that paper down and compare from the furthest section to the nearest section, i.e. to compare beamshots, piece by piece, from the top down.
More to be added.
I've aimed the camera at the horizon (so horizontal) which probably isn't the best way, I think aiming slightly downwards to a point on the road somewhere from 30 to 50 m away is better. This will be investigated and beamshots redone (aargh!) if necessary.
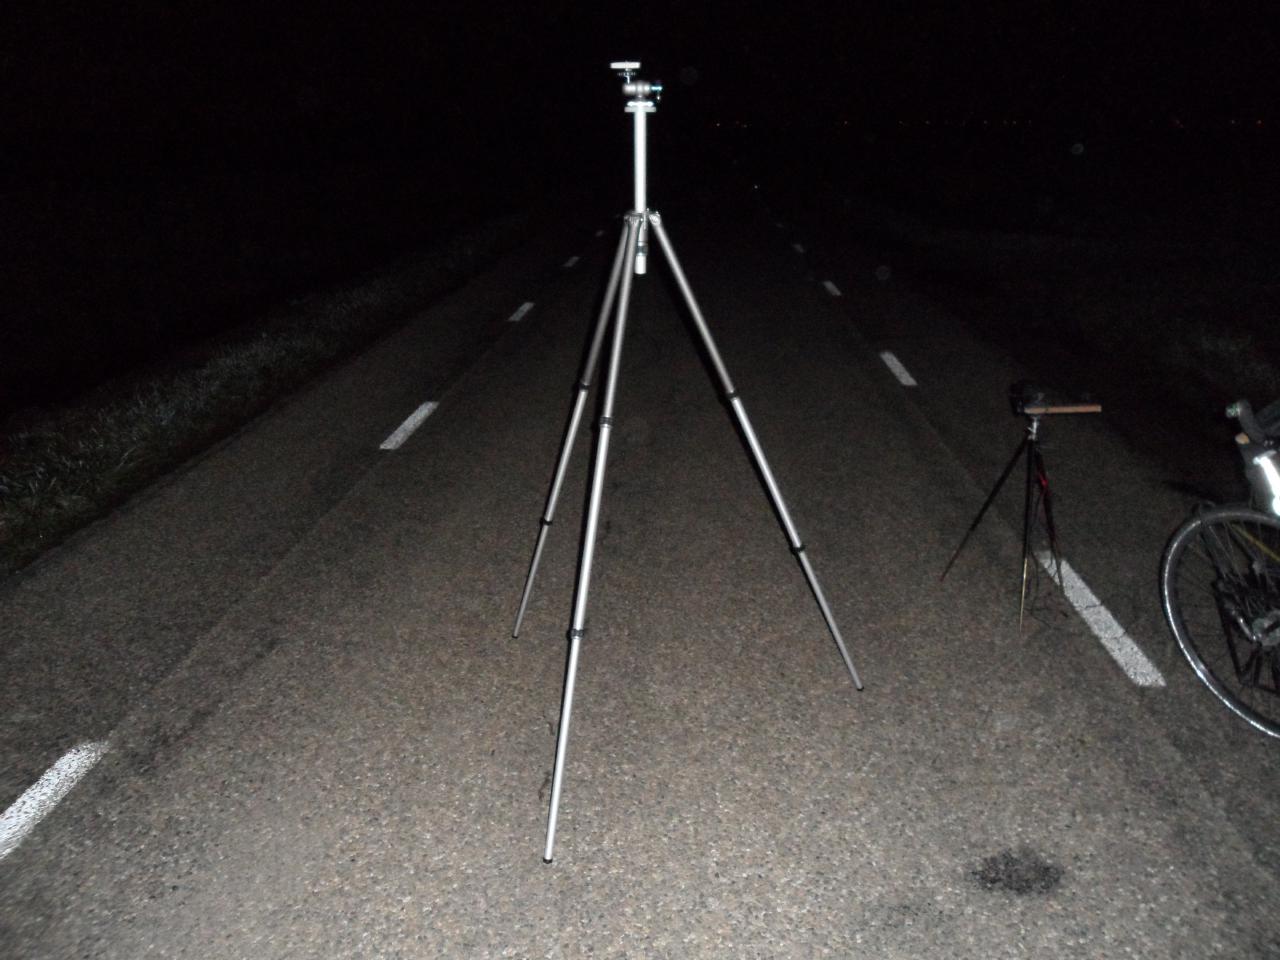
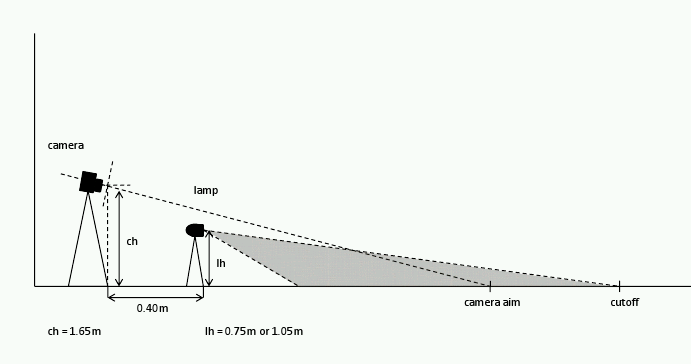
The camera should be at eye-height for an average height rider on a bicycle, which is about 1.80 m when sitting upright, and a few cm more on a suspension bike with higher bottom bracket. When sitting in a somewhat more sporty position it's about 1.65 m and in a very sporty, near road bike position it's about 1.40 m. At the moment I use a camera height (centre of the lens) of 1.80 m but I think I will choose the middle ground and shoot at 1.65 m in future.
The camera is positioned about 40 cm behind the lamp to give the same position as a bike rider behind a lamp. This perhaps is not optimal, a metre or 2 behind the lamp gives a better overview of the whole beam pattern which you won't see when looking straight on, but on your bike you don't sit still but look down too from time to time. This is also the reason why the camera aim should probably be to a point about 30 m away on the ground.
A headlamp is mounted typically at ca. 0.75 m high (measured at the centre of the front glass or lens) for a lamp mounted on the fork crown (on a bike with 622 mm rims), and at about 1.05 m for a lamp mounted on the handlebar. For a recumbent a lower height is appropriate, not sure what's typical, perhaps about 0.40 m?
To make it easy to aim the light beam, lamps will not be mounted on a bike for beamshots, but on a separate mount.
Note: With the current setup, it's hard, or rather it takes a long time!, to properly angle dynamo lamps such that they are set the best way, which is to give long throw, but not too high so oncoming traffic would be blinded which also means a less bright illumination of the road surface. Note that the lamp must be set to a different angle for each height to give optimal illumination of the road. The explanation for this can be found here. I will make a new setup to make this all easier, but it will always take a lot of time to make proper beamshots.
For taillamps the requirements are of course quite different to headlamps, therefore the way they are photographed is also quite different. I've been making pictures with the following setups:
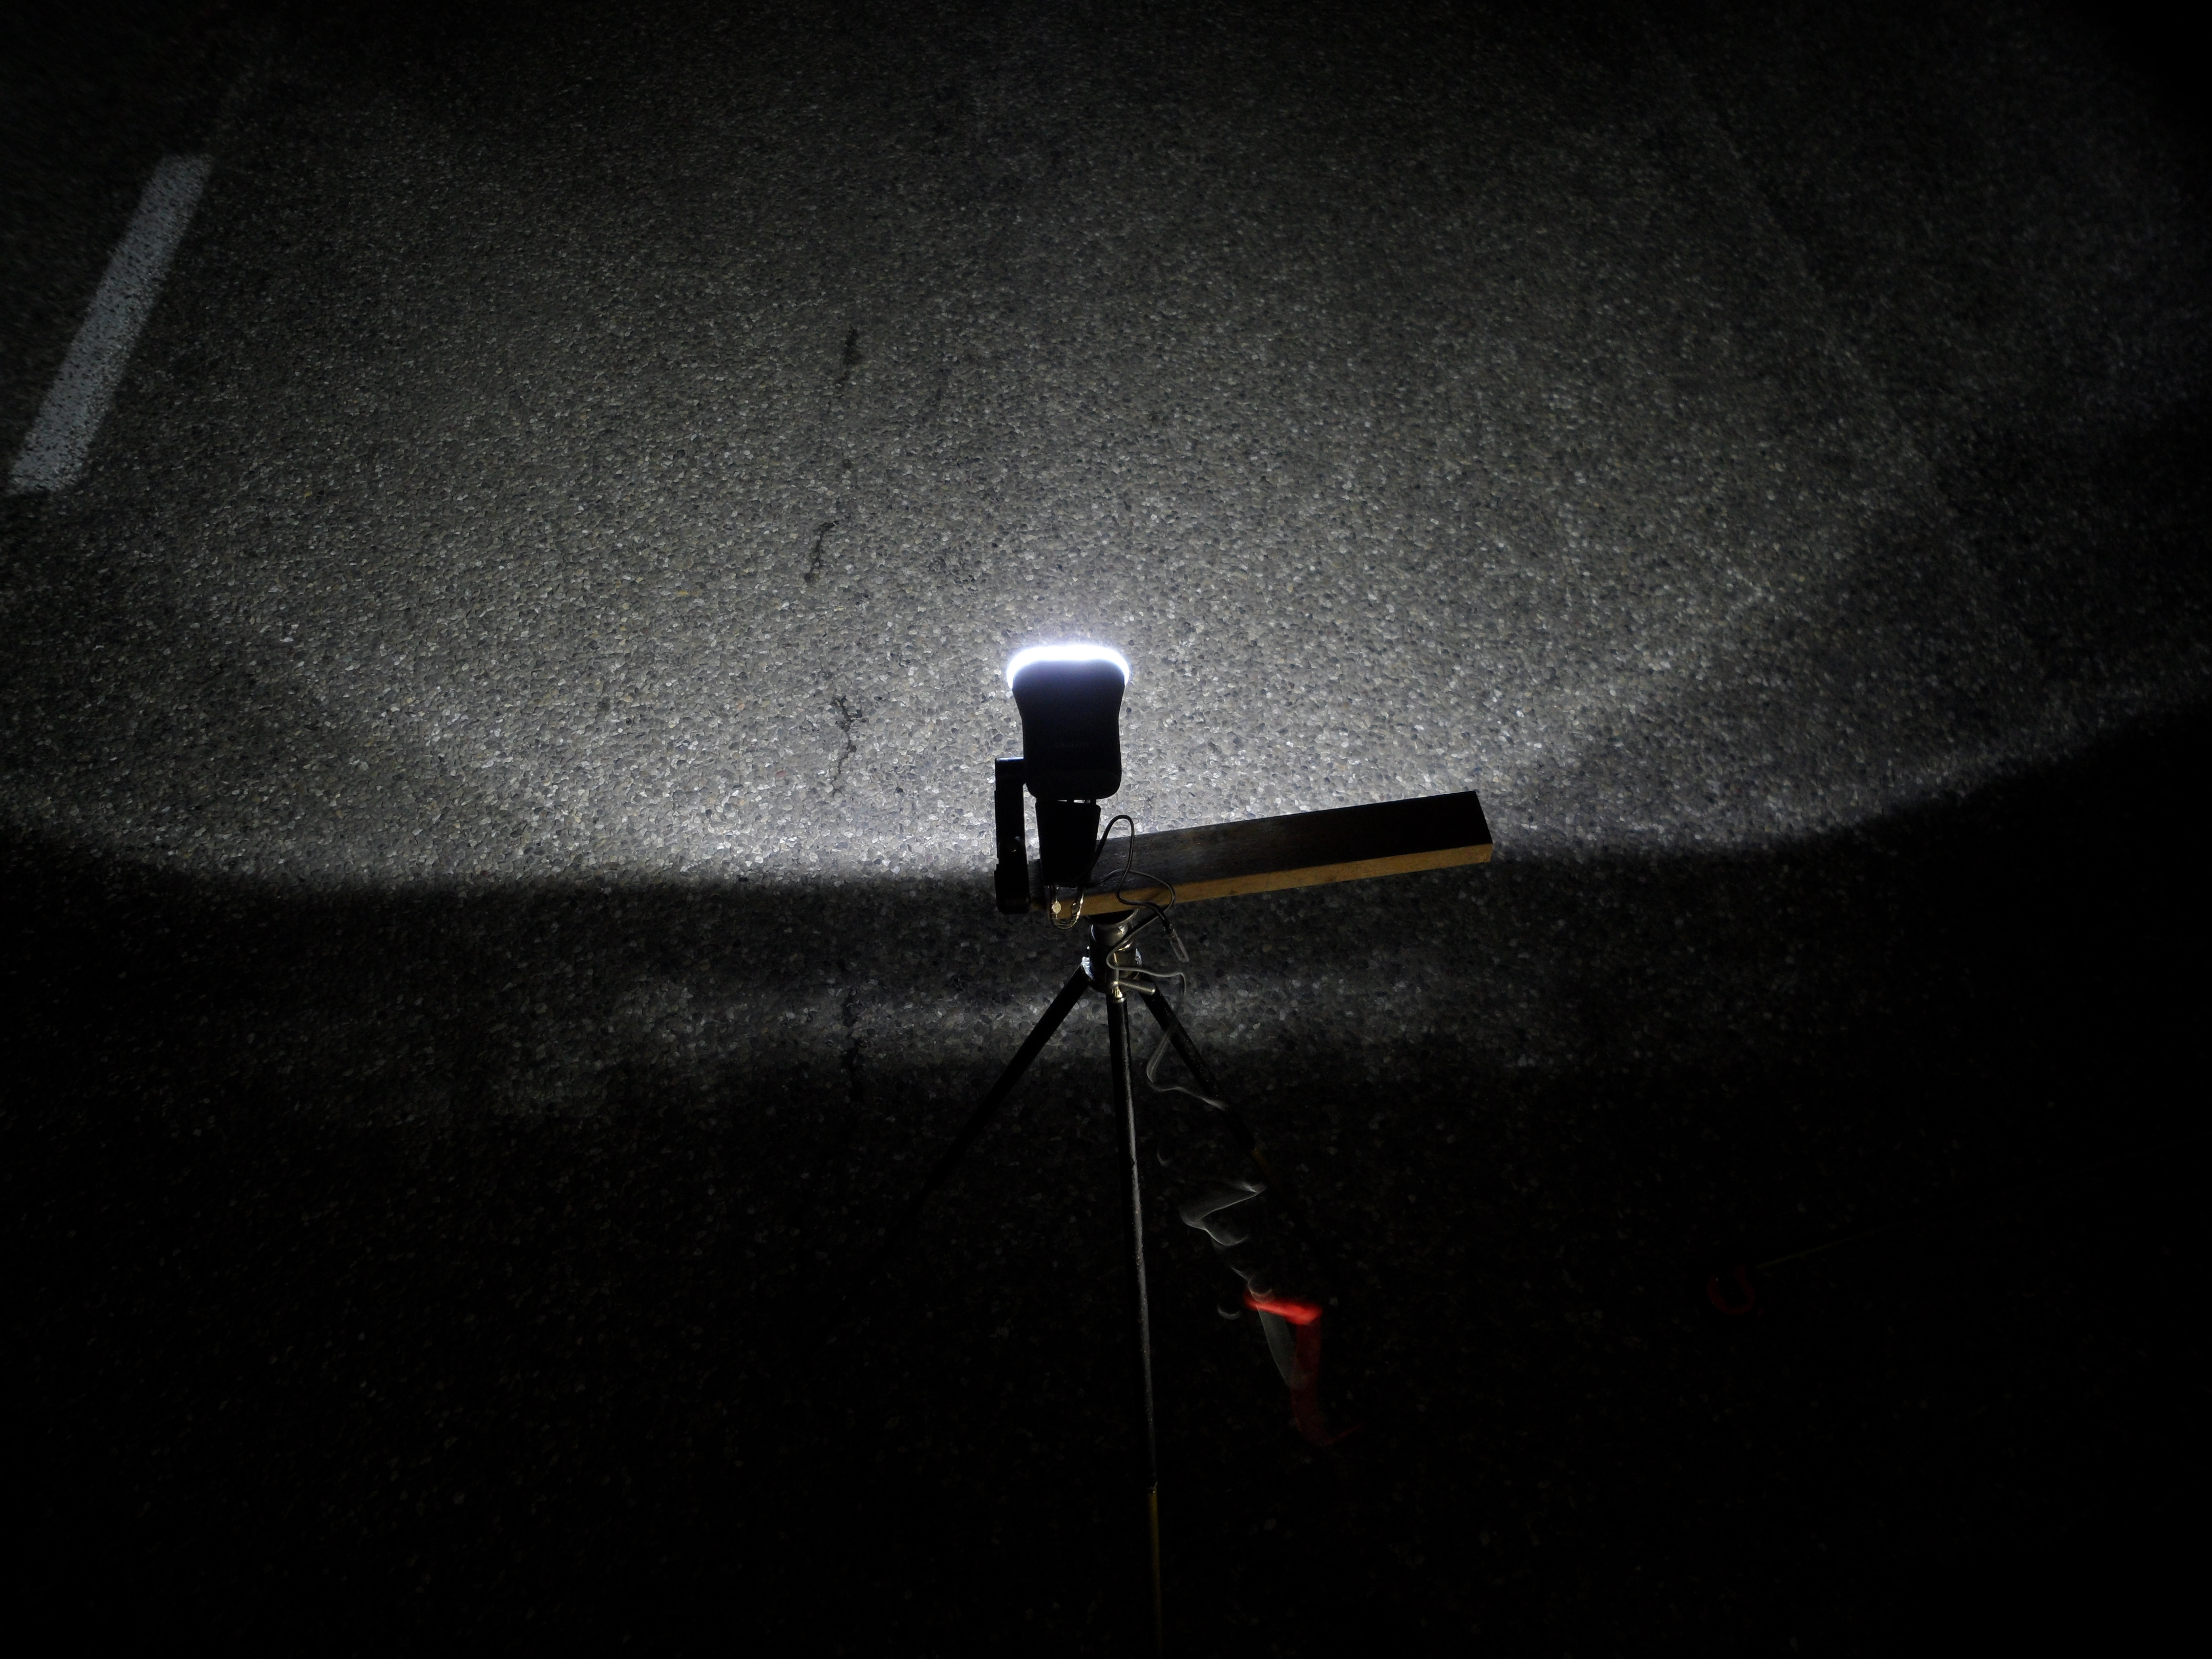
Out of a corner: This is of use to show the light that is shining upwards, forwards and to the sides. The lamp is placed 0.30m from the corner. Camera 1.00m from the lamp.
| Camera | Settings dim | Settings bright |
|---|---|---|
| EX1 | F3.9, 1s, iso 80 | F1.8, 1s, iso 80 |
| RX100 | F4.0, 0.5s, iso 200 | F4.0, 2s, iso 200 |
So the setting in the dim mode with the RX100 is a bit brighter than with the EX1 to give a factor 4 between dim and bright as with the oncoming shots.
To check the camera differences I made some test beamshots made with the Lineo (RX100: F4 ISO 200 0.5s & F4 ISO 200 2s) to compare with those made with the EX1 (EX1: F3.9, ISO 80, 1s & F1.8, ISO 80, 1s) I found that: A picture made with the RX100 at the F4 ISO 200 1s seems more equivalent to the low setting with the EX1 (so RX100: F4 ISO 200 0.5s seems a bit dimmer than EX1: F3.9, ISO 80), even though the RX100 setting gathers a bit more light... And the F4 ISO200 2s picture seems also a bit dimmer than the EX1: F1.8, ISO 80, 1s picture. I will think about how to deal with this. Perhaps increase the exposure time for the RX100. It gets a bit strange when considering the measured ISO values (dpreview) which for the RX100 are spot on with indicated values, but which are a factor 0.8 of the indicated values in the EX1 (so select ISO 80, it will be ISO 64). See http://www.dpreview.com/reviews/samsungtl500/6.
 EX1  : F3.9   1s ISO  80 (=actually ISO  64)   : 1 x 64 / (3.9)^2 = 4.21
 RX100: F4   0.5s ISO 200 (=actually ISO 200)   : 0.5 x 200 / 4^2  = 6.25

 EX1  : F1.8   1s ISO  80 (=actually ISO  64)   : 1 x 64 / (1.8)^2 = 19.8
 RX100: F4     2s ISO 200 (=actually ISO 200)   : 2 x 200 / 4^2    = 25.0
This means the images of the RX100 should be brighter than those of the EX1.
I will check this issue with another taillamp, as the Lineo I used for the RX100 shots was another sample than the one I used with the EX1, or perhaps there was an issue with my power supply.
Note that StVZO requires taillamps to shine some of their light forwards/upwards, so towards the corner:

| Camera | Settings dim | Settings bright |
|---|---|---|
| EX1 | F3.9, 1s, iso 80 | F1.8, 1s, iso 80 |
| RX100 | F4.0, 0.5s, iso 200 | F4.0, 2s, iso 200 |


| Camera | Settings dim | Settings bright |
|---|---|---|
| EX1 (zoom x 3) | F3.5, 1/250s, iso 80 | F3.5, 1/60s, iso 80 |
| RX100 (zoom x 3) | F5.0, 1/320s, iso 200 | F5.0, 1/80s, iso 200 |
| Corner shot | Wall shot | Visibility at 0° | Visibility at 45° | Visibility at 90° |
Visibility at 135° |
 |
 |
 |
 |
 |
 |
 |
 |
 |
 |
 |
 |
Distances are always to the emitting surface of any lamp, and the camera lens.
The shutter time should be such that there's no overexposure in particular, but this is difficult as the yellow in most taillamp beamshot pictures shows (which is in reality RED). I use the brighter settings to give a view of the lightoutput in darker regions. Perhaps I should use HDR to overcome the issues in cameras with dynamic range.
The white balance is not much of an issue with taillamps. I've experimented and used auto white balance and also WB=4600K. So I just use 'Auto'. This is a difficult subject especially for headlamps...
Summary: I currently use the following settings and positions:
Camera & lamp position:
Typical positions in real life are:
To give a proper impression of the beam shape and how useful it is, a selection of roads is useful. This is why I have made beamshots on not so perfect roads too, but the beam shape itself can of course only be properly evaluated on a flat straight road (which are roads 2 and 4 in the list below). A straight section of at least about 100 m is required as for example the Philips LED bike light has a throw of 70 m.
Road 1 ('Vriezekoop'):
Width: ca. 3.55 m (after the brief wider section at the bottom of the photo), reasonably smooth asphalt. The top of the bump is ca. 70 m away (by the tree, just after the bushes). This road is not very even, so beamshots don't show the beam pattern/illumination all that well.
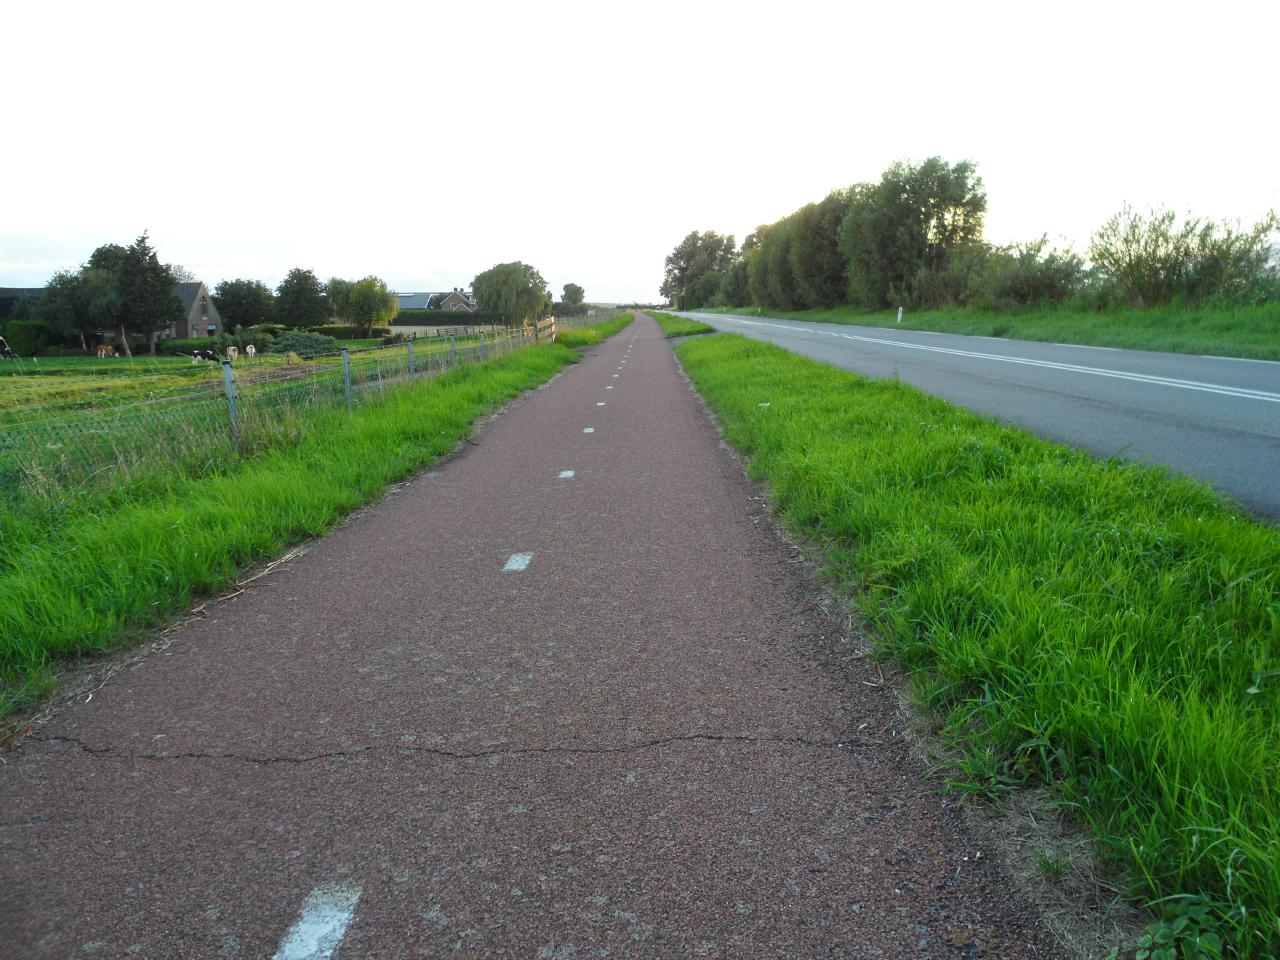
Road 2 ('Heiligegeest laan'):

Width: ca. 5.03 m, rough asphalt. This road is mostly straight, and that straight part is about 1 km long. The white stripes are ca. 3.80 m apart lengthwise (centre to centre), and the stripes on the left are ca. 3.10 m apart from the ones on the right (again, centre to centre). There's a bit of curvature from left to right, which is often done on purpose for various roads, namely to let rain water drain quickly to the sides. This is why in beamshots lamps with a wide beam such as the Philips LED bike light appear to be less bright on the sides of this road than they really are on a completely flat surface. It may not be completely flat lengthwise, at least on this section where the road appears to be slightly curved down (which results in sections far away appearing less bright than they would on a fully flat road), or perhaps that just appears that way in the pictures. I will investigate this at a later date.
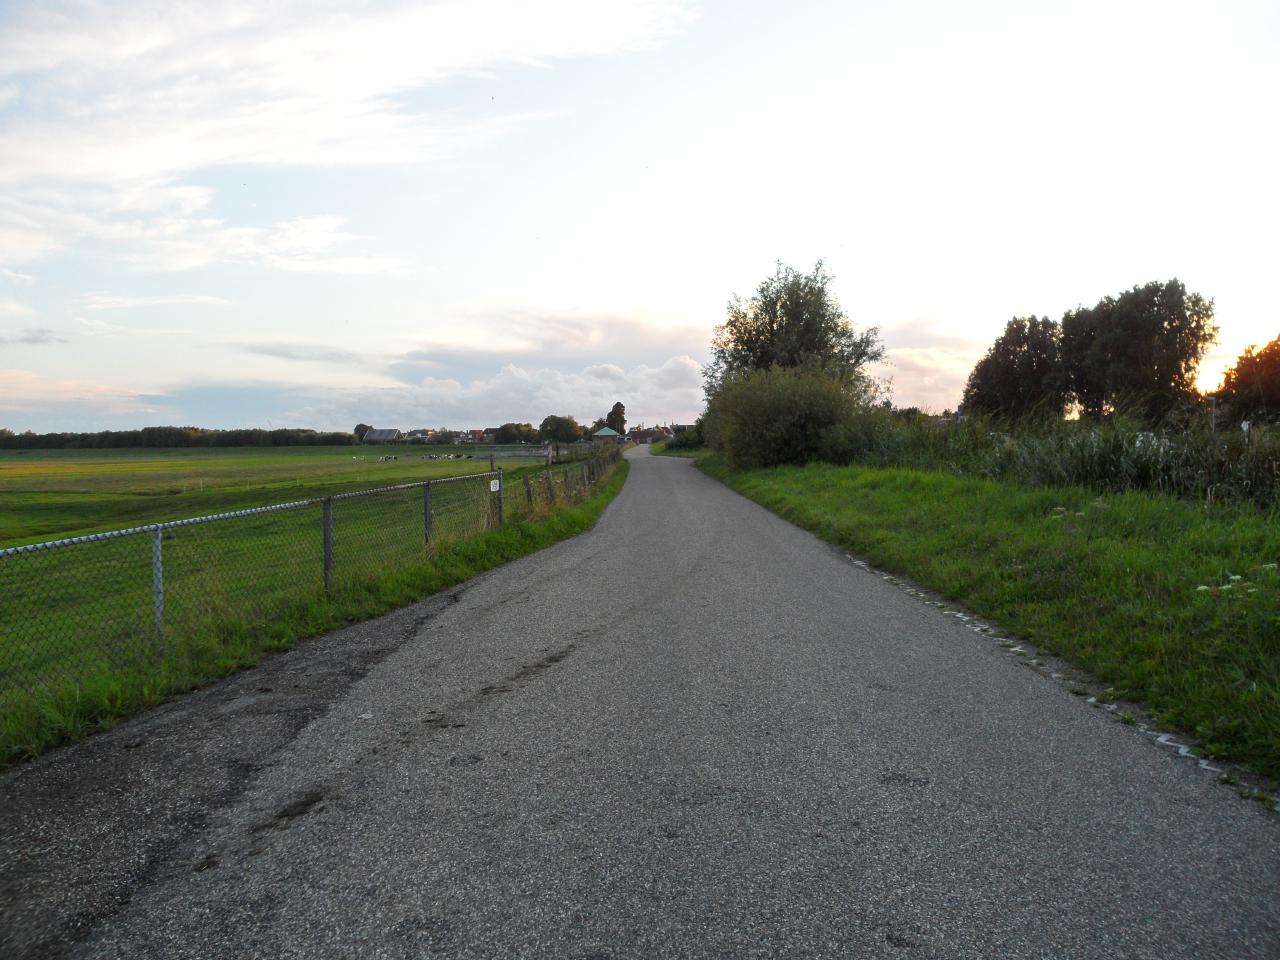
Road 3 ('Herenweg'):
Width: ca. 2.55 m, reddish asphalt, for bicycles only. Not all that flat, not all that straight. On the right you can see the road for cars, which is on the left in the next picture, as that has been made from the opposite direction:
Position 1 is actually where I make almost all beamshots:
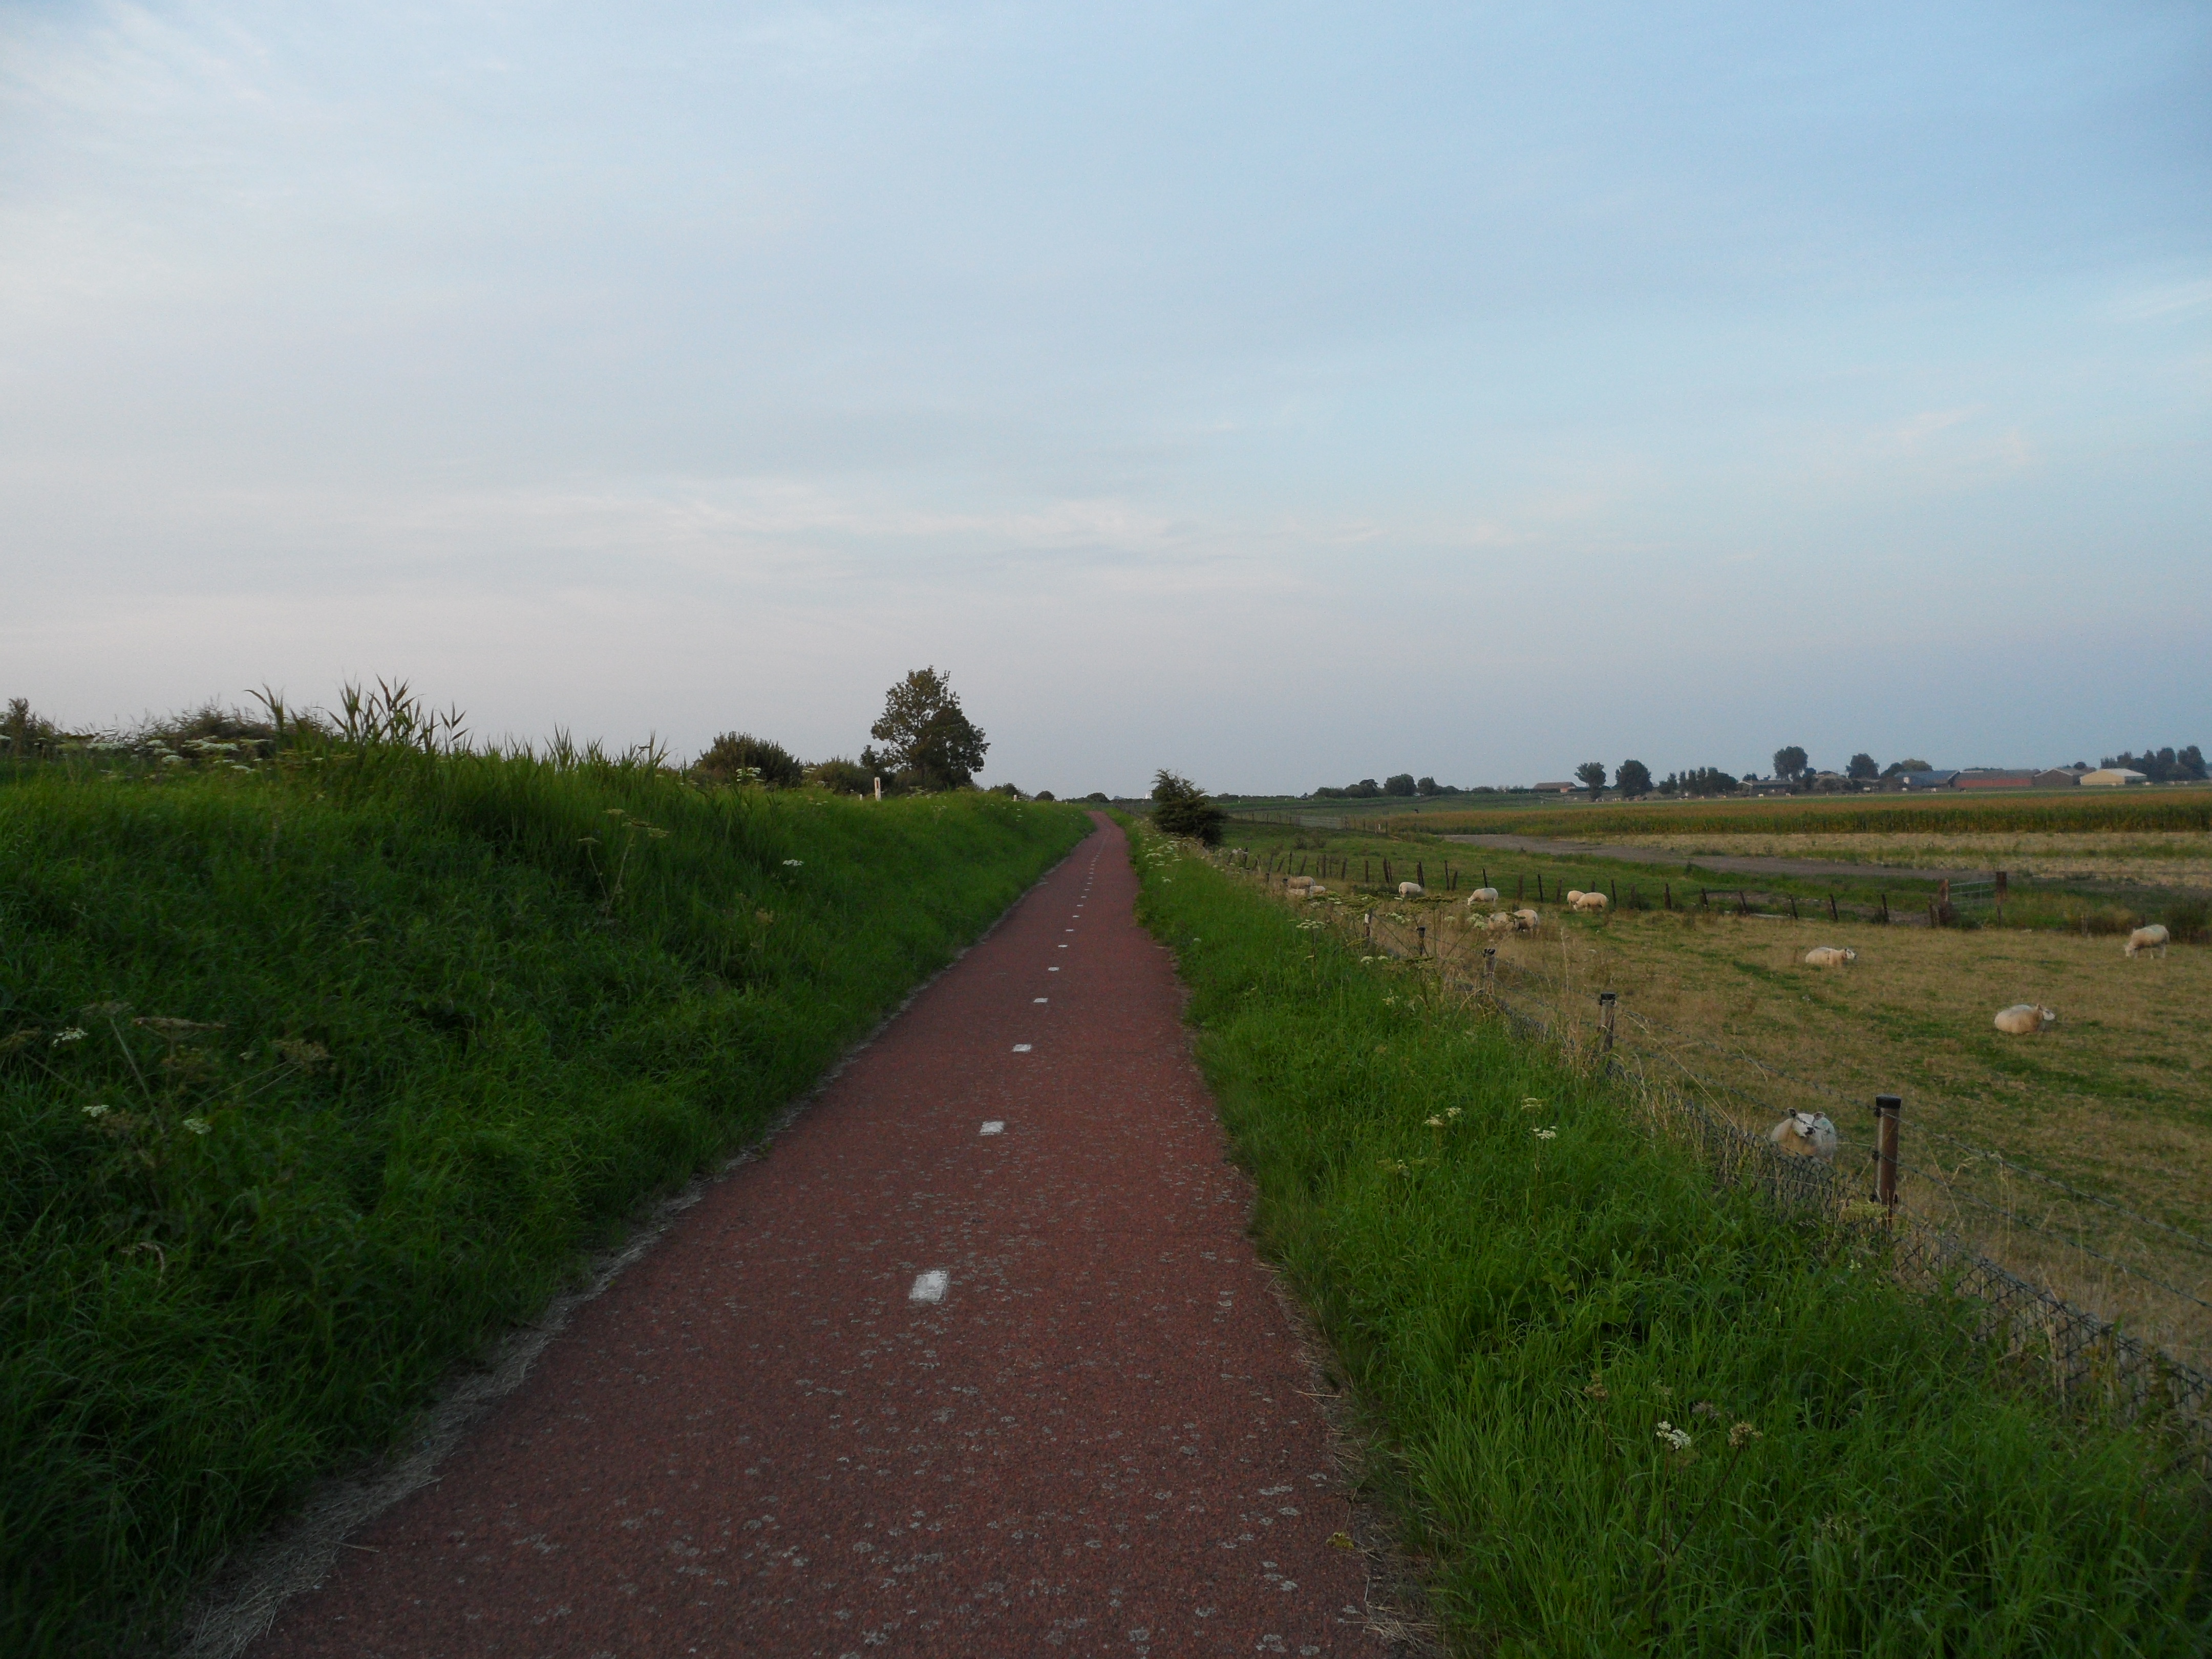
Note that on the left, on top of the dyke, is a road for cars, and when riding on road 3 with a bicycle on this road at night in the opposite direction as this photo, you get the full strenght of the low beam in your eyes which blinds me even when cycling with an Edelux. For these situations a 300 lumen 100 lux bicycle headlamp is needed...
Road 4 (parallel road to provincial road N207, for bicycles, mopeds, and local traffic from farms, i.e. their cars and tractors):
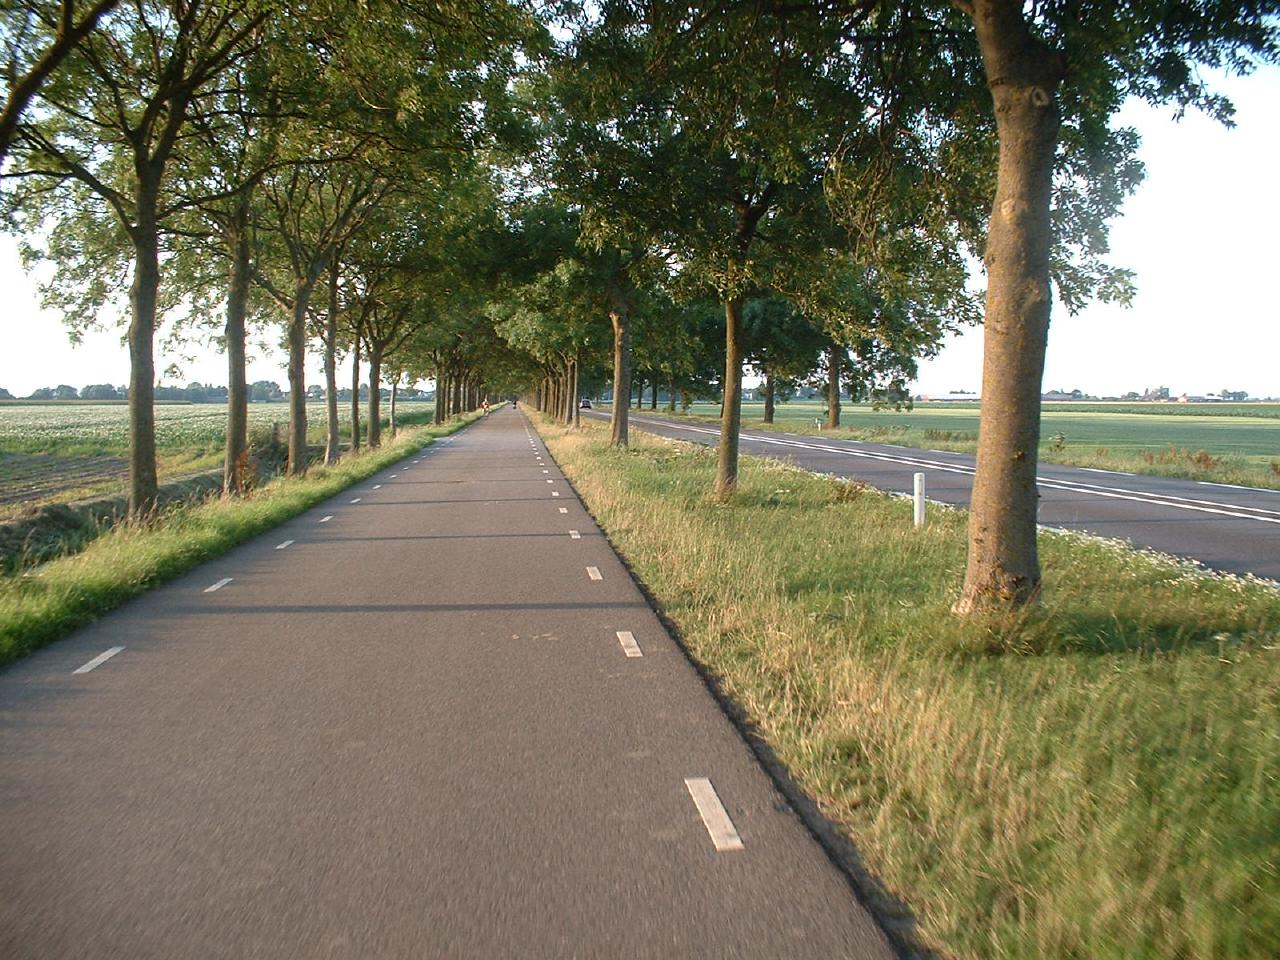
Width: ca. 3.85 m, dark and very smooth, completely flat asphalt. The white stripes are ca. 3.80 m apart (centre to centre), the stripes on the left are ca. 3.45 m apart from those on the right (centre to centre). This would be the best road to make beamshots except that even at night there's a fair amount of traffic which means making beamshots can get interrupted for minutes while I need to wait for oncoming traffic to go past. It's also the furthest away from my house. And of course as it's very dark asphalt, lamps look poorer than they do on most other surfaces.
If I can find a good long dirt path close to where I live, I will add that to my list of locations where to make beamshots.
Another issue is determining length/width on pictures. I usually place markers at 25 m, 50 m and 75 m. I'm still experimenting with the sort of objects (retro reflecting or not, size, colour), and perhaps I should lay out some markers on shorter distances as well, and some markers to gauge width despite saying how wide the road is, e.g. useful for light beams that are less wide than the road.
Btw., to make multiple equal retroreflective markers, I tried to get hold of some 3M Scotchlite reflective tape but couldn't find it anywhere on short notice. These tapes are hard to find in the Netherlands; The black reflective version (it reflects white!) of that tape seems even more elusive. Where can I get them? (and yes, I can order them online from another country but that seems rather silly just for some tape...)
|
I wasn't much interested in cameras before I started making beamshots. before that I had an Fuji 2600z from 2001 that I used for everything and it's good enough for pictures for my website and for holiday pictures it seemed good enough too. For beamshots it's useless.
In 2010 when I started to expand my bike light page (it was still a single page...) I bought a Samsung ST70 which is small, and was fairly cheap but still offered a nightmode with enough settings to make proper beamshots. For that purpose it worked well, but I wanted to experiment with full manual settings, e.g. white balance, so I dived into the subject of cameras.
I think an enthusiast compact camera is the least you need to make good beamshots, and a relatively large sensor and lens with big aperture is needed for videos that properly show the beamshape.
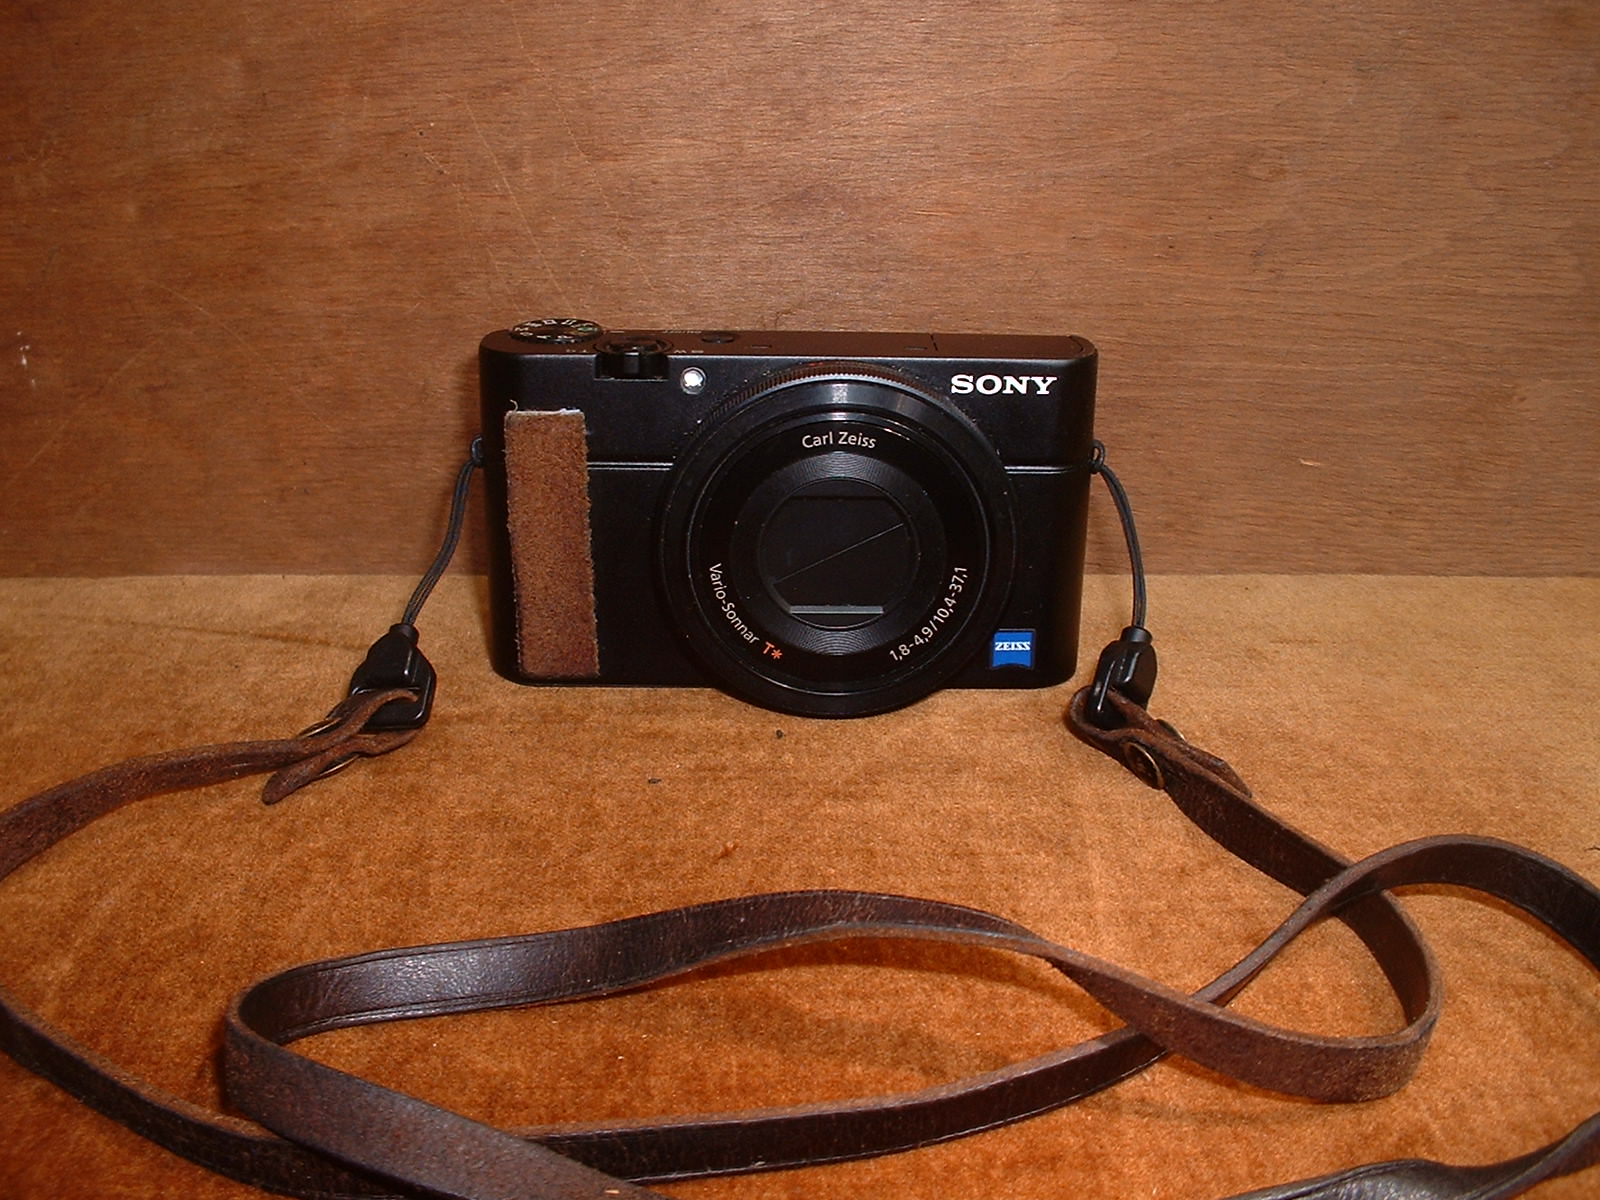
Current camera I use: Sony RX100, with a piece of leather added with very thin double sided sticky tape as a grip, and an old leather neckstrap from a pair of binoculars, probably from the 1950s:

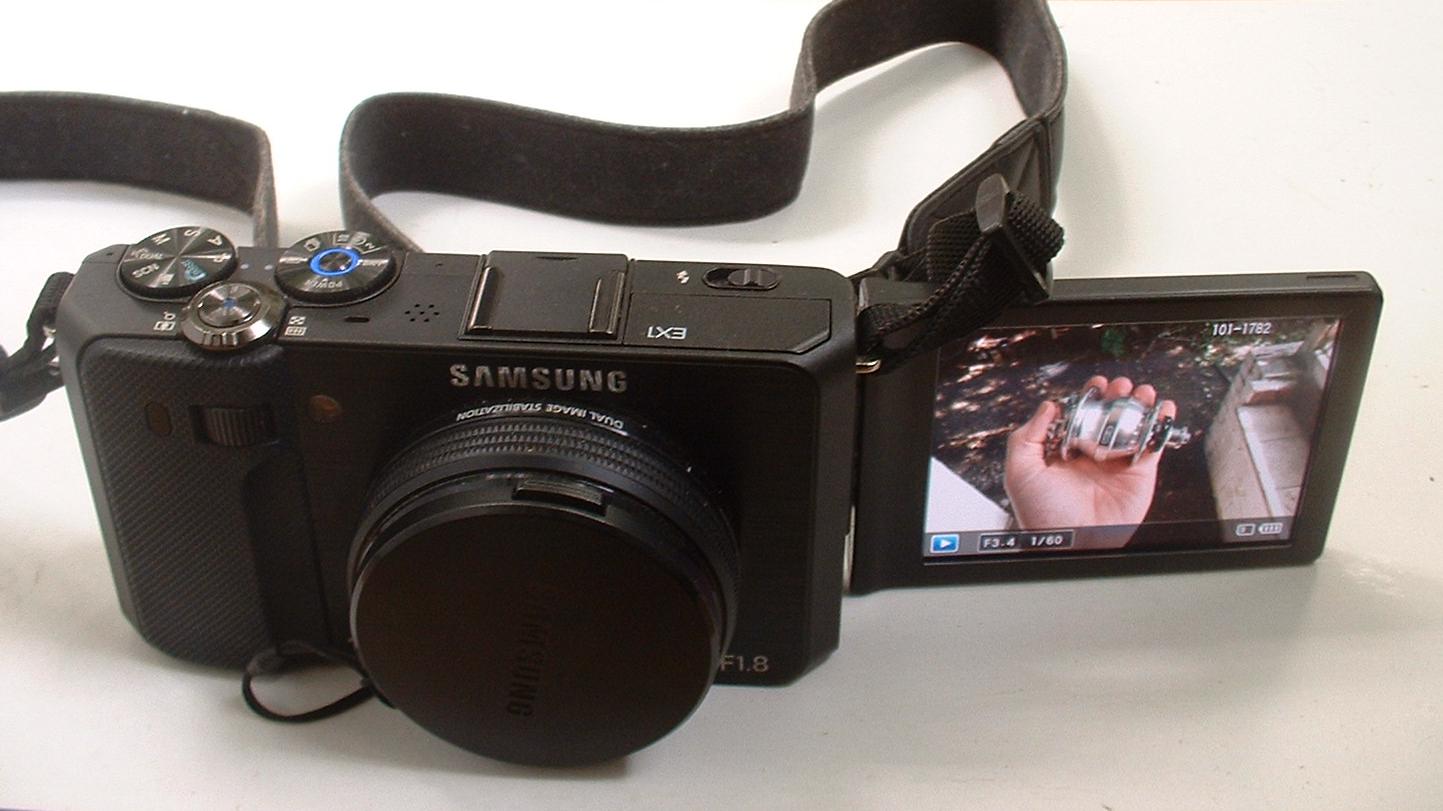
Previous camera I used: Samsung EX1:
For more details and comparisons of the cameras I tried see this page.
I only made a few beamshots before August 2010 and those were made with my trusty Fuji 2600z which I've been using for nearly 10 years and with which most pictures on this website have been made, but which isn't suitable to make beamshots as it has no manual mode (shutter time/F/ISO). That is also the reason why I made beamshots of dynamo lamps after buiying a new camera (The Samsung ST70).
Beamshots taken since August 2010 until January 2011 were made with a Samsung ST70 camera which allows enough settings (in night scene mode) to make proper beamshots. These beamshots are not comparable to the beamshots of the Magicshine nor the oncoming shot of the Edelux that I made with the Fuji 2600z.
Since mid September 2010 I have a new heavy tripod which is steady in windy conditions, but also high enough to give a view with the camera as a cylist has it of the road.
ca. 25 October 2010 I formalised the rules to make beamshots.
Compared to those rules there are several problems with the beamshots taken in August 2010 of the Philips LED bike light, and I would like to remake the beamshots. Here's a list of the issues:
Since October 2010 I started testing new headlamps and made various beamshots with the settings as listed in the overview, although I varied it a bit in my beamshot sessions to see what different settings, such as camera aim, make. These beamshots are all pretty good/useful I would say, but I was still experimenting.
In January 2011 I tried a Samsung WB2000 camera. Videos were hardly better than with the ST70, and worse was that I couldn't get good night time long exposure shots from it.
Since end of January 2011 I couldn't do any testing for several months and after that still only limited, both regarding saddles and lighting. I hope that will change in 2013...
In May 2011 I bought a Samsung EX1 which is now the camera I use for videos as well as beamshots. It works pretty well, and video is good enough for now but I used this camera most of all to make pictures of (the beam shots of) taillamps. Since then I've experimented with white balance using the EX1 and this is a tricky subject and I've not yet made my mind up which setting is best. Sometimes automatic whitebalance gives totally wrong colours, but using e.g. WB=4600K or WB=daylight more often give colours that don't look at all like what I see.
| To email me go to the email page |
Last modified: Sat Oct 26 11:08:50 CEST 2013